sworfish wrote: sworfish wrote:
Angel eye fitment.
First off you need:
-Set of angel eye rings
-Philips (cross head) screwdriver
-Flat side screwdriver
-Wd40
-Small tiny flat screwdriver
-Small hammer
-Hairdryer
-Drill
-Lots of patience
Head light assembly removal:
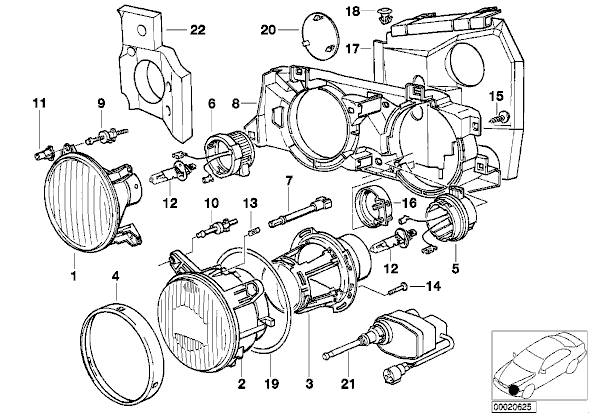
Using the flat screw driver gently prise the grill clip away from under the head lights ( at each corner (wing meets grill ) ) be careful not to scratch the paint once loosened then use the flat screw driver again and look through the middle of the grill at the bottom you will see the two retain clips , push down on these and pull grill slightly and it should allow these to pop out the clip , then on top of the grill there is a further two clips that you lift upwards to free the grill , now gently pull the grill out and be careful to make sure the clips are all loose ..
With the grill off now use the Phillips screwdriver and remove each of the 4 plastic screws and the metal one securing to the wing, this should loosen the black plastic surround and now can be lifted away leaving the lights.
Now on each light unit there is 3 adjusters(no.10), these break very easy so what I did was use the flat driver and where the adjuster passes through the base plate(no.8) there is a white circle clip with a small notch that sits on 2 tiny wee grooves if you push the notch over the two tiny grooves ( 90 degrees ) then the adjuster should be loosened and able to pull through the base plate .. This now let�s you remove the light units individually ( remember to remove the wiring plug at the back of the light unit) and soon you should have all four units off and sitting loose of each other ..
Lens removal:
All units have a chrome ring(no.4) which can be removed by pushing or pulling off the light unit (clips into place)
The two outer units ( side/low beam) are held on with a grey cushion seal , to loosen this you need to spray with wd40 and then use the hairdryer on the seal this seem to separate it (slowly tho) from the metal /glass , then using your tiny screwdriver slowly run it round the edge ( to loosen the seal ) repeat this continuly until the seal becomes sticky and breaks down allowing the glass to be gently prised off the metal casing ( this can be a long process dependant on the condition of the unit )
The inner units glass(no.1) it held on with acrylic so the wd40 wont work here � I used the small screwdriver and scored the seal gently then using the hammer gentle tap the driver around the seal chipping at the acrylic a wee bit at a time ( again time consuming) eventually the unit will pop off ( but make sure you loosen it all off to avoid breaking the glass )<SPAN style="mso-spacerun: yes"> </SPAN>
With the glass removed then you can fit the angel rings and using super glue position the ring inside the glass and tack each corner and the bottom of the horse shoe with the glue , holding it in place .. Leave these to dry,
Now take the drill and drill two small holes on each of the full beam units (allow connection of wires ) , now once the glass has dried fit the lads into the rings and push the wiring through the drilled holes ( full beam ) and the side light fittings ( side/low beam units) now using some super glue the glass back onto the metal units , and wait to dry � now take some silicon sealer and spread a thin seal around the lights joins ( between glass and metal unit) allow to dry to tacky and then push the metal rings back over the units and allow to dry ..
Hey presto now just reassemble the unit back into the car the same way they were removed. Use the existing wiring for the sidelights and connect you new angel eye wiring up to them.
| 


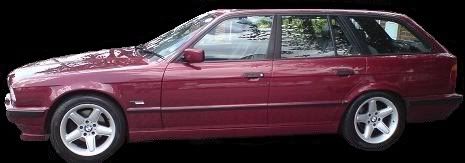
 E34 Angel Eye - How To
 Topic Options